Personalizing an Exploration View
- Chris Hickman

- Aug 21, 2012
- 4 min read
SAP BusinessObjects Explorer provides the ability to interact with data providing insight that goes beyond standard reports. However, the question of data security must be addressed when we interact with this data. One of our recent clients had a requirement to provide users the ability to use the SAP BusinessObjects Experience iOS and desktop app while restricting access on data to which they have access. We worked on this demo and provided a very compelling experience for our client. In this blog, I will share with you what we did to fulfill these requirements.
Database Considerations
First of all, we started with a data source. The data source that we have contains eFashion data migrated from Microsoft Access to Microsoft SQL Server. Of course, the data provider doesn’t matter. Secondly, we added a table that contains a row level mapping of data to individual users. For instance, we had a restriction that requires a user to see two states: California and Colorado. A second user should be able to see DC, Florida and New York. A third user should be able to see all states. A fourth user should have no access. Here is the view of the table that we created:ManagerStateJames.MasonCaliforniaJames.MasonColoradoJames.MasonDCJames.MasonFloridaJames.MasonIllinoisJames.MasonMassachusettsJames.MasonNew YorkJames.MasonTexasMarshall.KelleyDCMarshall.KelleyFloridaMarshall.KelleyNew YorkMel.WhatleyCaliforniaMel.WhatleyColorado
Next, we updated the standard eFashion universe to include this new security table and link it together with the state field of the existing Store table. That’s it for the data source. We can now link data with individual users on the database level.
SAP BusinessObjects Explorer
Now that the data source is created and the universe is developed to use the database, we can now create our first Information Space on top of the data source. Create a new Information Space containing fields for the manager name and the state. This association represents the data to which each user has access. Finally, save and index the new Information Space. This is the Reference.

Next, build a second Information Space that contains all of the facets and measures to be used with Explorer and Experience. Specify the correct properties, objects and scheduling (if needed). If you have implemented security on the database or universe level, Explorer effectively strips that security away when you index the Information Space. Data is brought into Explorer from the data source according to the security of the user performing the index. When users execute the Information Space in Explorer, they see the data that the indexer had access to see.
The key step in enabling security is to use the Reference Information Space in the final Information Space. Explorer compares the current User Name with the specified Manager field and performs the filtering on demand. As users log into SAP BusinessObjects or into the iPad, the Manager field is filtered according to the user’s login id. If a user’s login id does not exist in the Manager field, no data will be returned and the user will see a message stating this fact.
Personalization
To establish a personalized Information Space, click the Personalization tab of the final Information Space. Click the check mark beside “Personalize Information Space Exploration” then click the down arrow beside the Exploration View selector to the right. Browse through the available data providers and select the Reference Information Space. There are two parts on the bottom of the screen: To Filter and Filtered by. In the To Filter, map the User Name field to the Manager field in the Filtered by section. We are filtering States in this example, so select State in the Filtered by section on the same line as the State in To Filter. Your final Personalization screen should appear like this:

Exploration Views
Now that we have two Information Spaces created, we can now build Exploration Views from the final Information Space. The personalization happens on the Information Space and is extended to the (Exploration) views that are built on the spaces. To create an Exploration View, open the Information Space. Click Create View Set and design your Exploration View. Click Save and provide a name. Switch over to the Exploration View Sets section and click your new Exploration View. You should now see your design personalized for the currently logged in user. Below are screenshots for four users. The first three have access to certain states. The fourth has no access to any data.
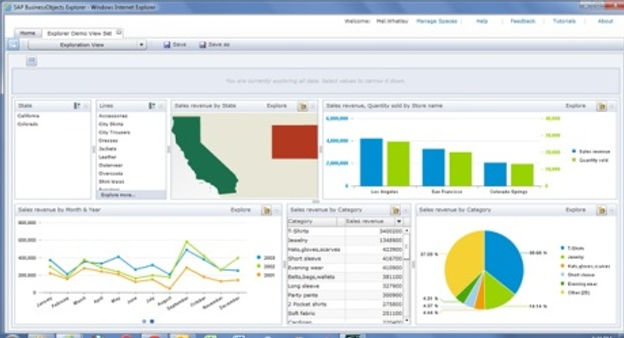
The user above has access to California and Colorado.

The user above has access to DC, Florida and New York

The user above has access to all states

This user has access to nothing.
Conclusion
SAP BusinessObjects Explorer provides a unique visualization tool that allows users to interact with data in new and different ways. Data security and Explorer are not mutually exclusive. In this article, we discussed the standard capabilities of Explorer and Exploration Views. Administrators have the ability to apply Personalization to restrict data for users that explore the personalized data sources. Users who have access to the spaces and views but no access to the data will be restricted. Users with partial or full access to the data will see their data represented accordingly. Only users who have access to modify the underlying Information Spaces can control the Personalization settings within Explorer.

Comments